Documentation This documentation applies only to iceScrum v7.
For old iceScrum R6, read the documentation or migrate.
-
1 - Install or Upgrade
-
2 - Getting started
-
3 - Core features
4 - Apps & integrations
Neatro
Companion
MURAL
Microsoft Teams
Discord
iObeya
Zoom
Google Hangouts Meet
Jamboard by Google
Miro
Jitsi Meet
Mattermost
Custom project dashboard
Agile KPIs
Webhooks
Forecast
Agile fortune
SAML Authentication
Labels
Share
Zapier
Story workflow
FeatureMap
Time tracking
Diagrams & mockups
Epic stories
Portfolio
Project Roadmap
Toolbox
External authentication
Continuous integration
Cloud attachments
Team capacity
Bug trackers
LDAP / Active Directory
Slack
Project administration
User administration
Server administration
Git & SVN
Data export
Mood
Excel import
Task responsible
Story vote
Story template
Apps & integrations
Custom Backlogs
-
5 - Migration
-


Automatically synchronize your project data between your bug/ticket tracker and iceScrum.
![]()
![]()
![]()
![]()
![]()

This integration is two-way: you can import issues from your bug tracker to create iceScrum stories and you can automatically update issues in your bug tracker when the corresponding stories are updated.
Principles
The iceScrum bug tracker integration is divided into several Apps, one for each bug tracker iceScrum is integrated with. Most of the integration logic is shared among them, that’s why the documentation is unified.
There are 4 steps to define the integration with a bug tracker:
- Enable the App,
- Set up the connection in your project settings,
- Import issues thanks to import rules (bug tracker -> iceScrum),
- Update issues according to story updates thanks to synchronization rules (iceScrum -> bug tracker).
Please note that there is currently no way to update or delete a story when the corresponding issue is updated or closed.
The bug trackers currently available are:
- Mantis BT: 1.2.15 and greater (2.x is supported),
- Bugzilla: 3.6 and greater with the XML-RPC plugin installed , refer to the dedicated section,
- Trac: 1.0.1 and greater with the XML-RPC plugin installed , refer to the dedicated section,
- Redmine: 2.6.2 and greater, refer to the dedicated section.
- Jira: On-Premise 6.2.7 and greater, refer to the dedicated section. Jira Cloud is NOT supported yet.
- VSTS and TFS: Visual Studio Team Services and Team Foundation Server starting from 2015, refer to the dedicated section.
We developed this integration as part of our sponsoring service that allows companies to give top priority to the development of a feature of their choice. We want to thank our clients who sponsored the integrations currently available.
If you too want to sponsor a feature (e.g. the support of another bug tracker) or if you want more details about our sponsoring service, please contact us.
Connection configuration
Create configuration
Don’t forget to enable the App corresponding to your Bug Tracker. Then, open your project settings and enter valid connection information to create a bug tracker “configuration”:
- Name: will identify the connection and be used as a tag for synchronized stories so it must be unique.
- Type: choose your bug tracker tool: Mantis BT, Bugzilla, Trac, Redmine, Jira or VSTS.
- URL: the URL of your bug tracker.
- Login: the username of a user having sufficient permissions on your bug tracker, according to what you want to do.
- Password: the password of a user having sufficient permissions on your bug tracker, according to what you want to do.
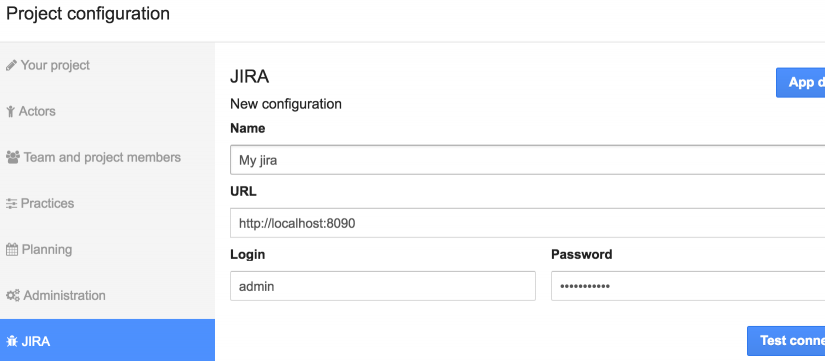
Then, click on “Test connection”. If the connection fails, an error message will be displayed underneath but a closer look to the logs (icescrum.log and catalina.out) will give you more insights about the issue.
If the connection succeeds, additional fields will be displayed. Remote projects will be fetched and you will have to choose the one you want to integrate with your iceScrum project (for Trac, there is only one possible Project for a given URL).
Don’t forget to click on “Create” when you are done.
Update or delete configuration
You can update connection information on existing configurations.
If you want to stop all automatic imports and synchronizations, you can either disable the configuration or delete it.
Refresh remote fields
In order to create import and synchronization rules, you will use fields and values that are fetched from the bug tracker. They are automatically fetched on the first connection and cached in iceScrum. If you want to use the latest versions of these fields, click on “Refresh remote fields”.
Bugzilla configuration
This integration requires a XML-RPC endpoint on your Bugzilla server. It is enabled by the XMLRPC::Lite Bugzilla Perl module (alternatively, it seems that Test::Taint could do the job).
You can check that your Bugzilla server has the XMLRPC::Lite Perl module installed by checking this URL in your browser: http://bugzilla.yourserver.com/xmlrpc.cgi, it should display a blank page. You may also try this cURL command that returns the version of your Bugzilla server:
curl http://bugzilla.yourserver.com/xmlrpc.cgi
     -H "Content-Type: text/xml"
     -d "<?xml version='1.0' encoding='UTF-8'?><methodCall><methodName>Bugzilla.version</methodName><params></params></methodCall>"
If an error is returned then there is a problem on your Bugzilla server, probably related to missing modules. You can log in as root on your Bugzilla server and check the installed modules:
./checksetup.pl --check-modules
You should have XMLRPC::Lite and all the required modules installed. If it is not the case, here is how to install a module (repeat for each required module):
./install-module.pl XMLRPC::Lite
Then check that it is correctly installed with:
./checksetup.pl --check_modules
If an installation fails, it may be related to a missing XML parser library: XML::Parser. The installation of this module via CPAN may fail so here is how you can install it with apt-get (on Debian-base operating systems):
sudo apt-get install libxml-parser-perl
Trac configuration
This integration requires a XML-RPC endpoint on your Trac server. It is provided by the XML-RPC plugin (see http://trac-hacks.org/wiki/XmlRpcPlugin).
You can install the plugin with the following command:
sudo easy_install -Z -U http://trac-hacks.org/svn/xmlrpcplugin/trunk
Then, you need to enable it in your trac.ini configuration file:
[components]
tracrpc.* = enabled
You can check that this plugin is properly installed by checking this URL in your browser: http://yourTracServer.com/YourProject/rpc. It should display the RPC API documentation, including the API version. The iceScrum integration requires the API version 1.1.2 or greater (this is not the Trac version). This page also displays the required permissions for each action.
The Trac user used by iceScrum must have the following permissions (pick one):
- either XML_RPC, TICKET_VIEW and TICKET_MODIFY,
- or XML_RPC and TICKET_ADMIN,
- or TRAC_ADMIN.
Permissions may be inherited from groups such as “authenticated” or “anonymous”.
If you use the AccountManager plugin login module, read the following instructions:
In order to use the XML-RPC API, iceScrum needs to authenticate through automatic means. The default Trac HTTP login module (trac.web.auth.loginmodule) allows automatic authentication, while the AccountManager HTML login module (acct_mgr.web_ui.loginmodule) does not. Fortunately, the HttpAuthPlugin plugin reinstalls the HTTP authentication on specific paths. Here are the instructions to use it:
1. Install HttpAuthPlugin :
easy_install -Z -U http://trac-hacks.org/svn/httpauthplugin/trunk/
2. Enable the plugin in trac.ini
[components]
httpauth.* = enabled
3. Configure the path for HTTP authentication in trac.ini
[httpauth]
paths = /login/xmlrpc
4. Configure Apache so it does not strip the authorization information (in httpd.conf):
WSGIPassAuthorization On
Redmine configuration
On the Redmine side, you only need to enable the REST web services when logged in with an administrator account, as follow:
Administration > Settings > Authentication > Enable REST web service
or Administration > Settings > API > Enable REST web service
The Redmine user that will be used by iceScrum needs “Save queries” “View issues” and “Edit issues” permissions on the projects you want to integrate. If you want iceScrum to retrieve custom fields or users from Redmine then the user will need to be an administrator (this may seem overkill but Redmine seems to require that).
Please note that when creating the configuration, you will not get an error if you enter wrong credentials. Instead of failing, Redmine will provide the list of public projects that are available for anonymous users. Thus, ensure that the projects match the projects associated to the iceScrum Redmine user before saving the configuration.
The Redmine URL to use in iceScrum bug tracker configuration is the Redmine server base URL, without any ressource. It is generally the URL of the redmine welcome page.
Jira configuration
Jira REST API
The Jira REST API is required by this integration. It should be enabled by default on your Jira instance.
Jira user
The Jira user that will be used by iceScrum needs sufficient permissions depending on what you want to do. Basic usages require browsing projects and issues and updating issues. Most advanced ones require resolving issues, closing issues and changing the issue assignee and reporter.
When creating the configuration, if you enter a wrong password several times in a row then the authentication for this user through the API will be disabled and you will get a “403 forbidden” error message. In such case, you will need to authenticate through the Jira application and enter a CAPTCHA to re-enable the API authentication.
Transitions
The Jira REST API lacks proper support for transitions so we apologize for the limitations you will come across in this integration.
If you want to get a nice list of available transitions then the iceScrum Jira user will need to be an administrator. In this case, all the transitions will be displayed, grouped by workflow, for all the workflows of your Jira server (because Jira provides no way to filter the workflows associated to a specific project). Otherwise, you will have to enter the transition name by hand, which is more error prone. In both cases, the transition will be triggered according to its name and only its name (there is no technical id check nor workflow check) so it needs to match the name displayed in Jira when logged in as the iceScrum Jira user (ensure that you use the same language).
If the synchronization rules defined on a given story for a given state include a transition update and if the transition is associated with a screen, iceScrum will automatically try to complete the screen according to the other rules. Remaining rules will be executed through a regular update. Please note that updates provided with the transition may be overridden by Post Functions defined on the transition.
Workflow schemes allow defining different workflows depending on the issue type. Be careful when defining transition rules: the transitions must be available for all the issue types that will be imported in your iceScrum Jira configuration. If you have to manage issue types that have different workflows then we recommend that you create an iceScrum Jira configuration for each issue type.
Visual Studio Team Services configuration
- VSTS work items: Create iceScrum stories from VSTS work items.
- VSTS CI: Link VSTS builds to iceScrum.
- VSTS code: Link VSTS commits to iceScrum tasks.
Authentication
To authenticate iceScrum in VSTS you will need to get a Personal Access Token (PAT).
See microsoft official documentation on how to generate a PAT in Visual Studio Team Services.
This personal access token expires after a while, so think about adding a recall in your team calendar to refresh the token before it expires.
Required scopes for the personal access token:
- Project and team (read)
- Work item search (read)
- Work items (read and write)
Connection from iceScrum
In the connection setup you enter
- Url: https://mydomain.visualstudio.com replace your domain accordingly.
- Login: The account with which your generated the personal access token
- Password: The personal access token
Importing user stories with VSTS queries
The queries to import stories in iceScrum are retrieved directly from your VSTS project. The most common setup is to import “New” user stories in VSTS as “Suggested” user stories in iceScrum. To achieve this you will have to create a query for “new user stories” in VSTS. You can create queries in VSTS from your project’s “Work” tab. They will be automatically available in iceScrum.
We recommend using only “flat” queries for mapping user stories or backlog items from VSTS to iceScrum user stories. iceScrum is however able to import any kind of visual studio work items into user stories.
Mantis configuration
On the Mantis side, you only need to have php module installed & enabled: php-soap
Import rules
Create import rules
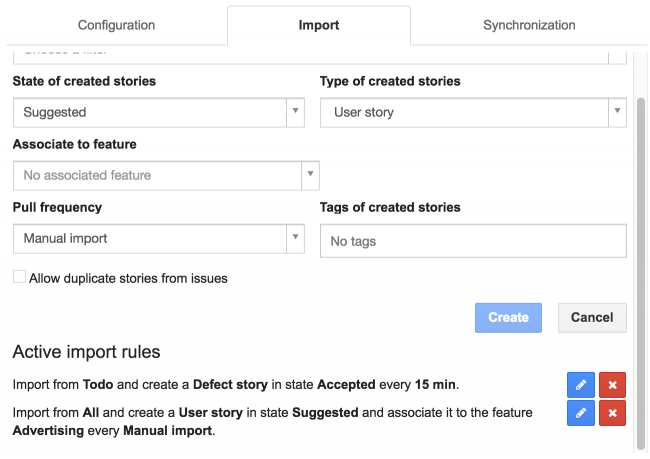
Once your connection is set up, you can create import rules in order to import issues from your bug tracker into iceScrum. They will be imported as iceScrum stories.
You can filter the issues to import according to remote fields:
- Mantis BT: Mantis filter: a filter that exists in Mantis. You cannot create multiple import rules for the same filter.
- Bugzilla: Component, Status.
- Trac: Component, Status, Type, Resolution, Priority, Version, Milestone. If you choose no field then all the issues will be fetched.
- Redmine: Query: a query saved on the Redmine user account used by iceScrum. You cannot create multiple import rules for the same query.
- Jira: Filter: a favourite filter saved from a search on the Jira account used by iceScrum. You cannot create multiple import rules for the same filter.
- VSTS: Query: a query saved on the VSTS account used by iceScrum. You cannot create multiple import rules for the same query.
Then you can customize the new stories:
- State of created stories: you can create “Suggested” stories that go in the sandbox and “Accepted” stories that go in the backlog. Further states aren’t supported since they rely on the iceScrum workflow.
- Type of created stories: you can choose “User story”, “Story defect”” or “Technical story”.
- Associate to feature: optional.
- Tags of created stories: you can choose tags to categorize the stories (e.g. depending on the import rule) and find them easily later.
Finally, configure the import:
- Pull frequency: you can choose manual import (see explanation below) or periodic ones (every 1, 5, 15, 30 or 60 minutes).
- Allow duplicate stories from issues: whether iceScrum should create new stories for issues that have already been imported. Duplicates should usually be avoided.
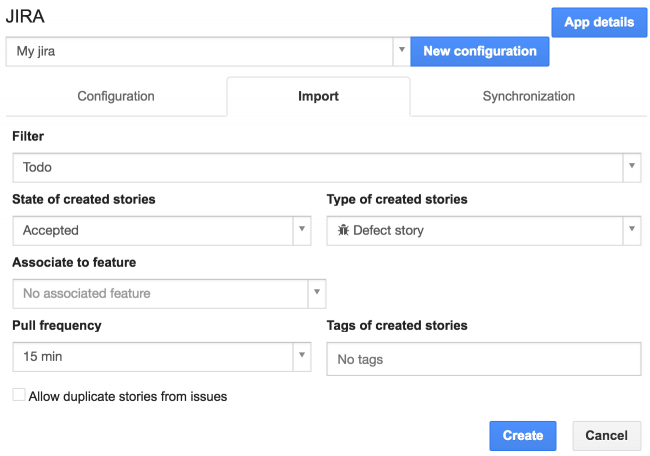
Don’t forget to click on “Create”. You can create as many import rules as needed.
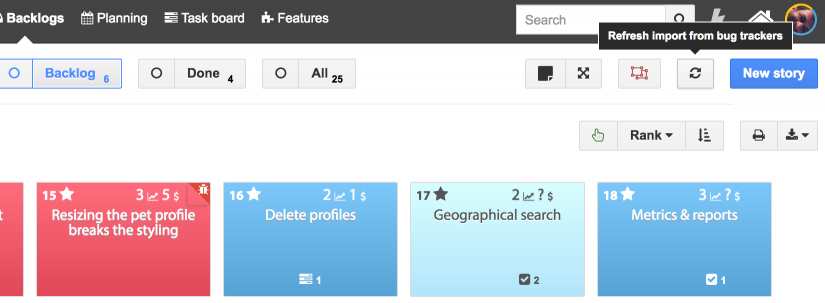
Manual imports can be triggered from the Sandbox and the Backlog by clicking on the refresh button in the toolbar of these Backlogs. In the sandbox, only rules for “Suggested” stories will be triggered. In the backlog, only rules for “Accepted” stories will be triggered.
Imported stories
Imported stories are created according to the imported issue data (values may be truncated to fit iceScrum fields) and your custom configuration. Some fields receive “special” values:
- creator: filled with the first Product Owner or Scrum Master found in your team.
- tags: in addition to custom tags, the configuration name is added (capitalized and without spaces). This tag is displayed in the configuration summary, click on it in order to display all its imported stories.
- origin: combines the configuration name and the issue ID that materialize the link between the story and the issue.
Update or delete import rules
Import rules can be updated or deleted.
Synchronization rules
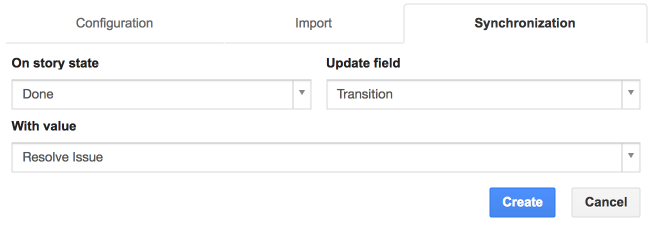
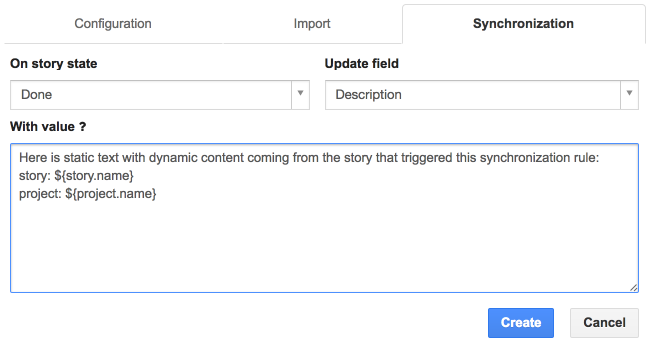
Create synchronization rules
When imported stories change state in iceScrum, you can automatically update the corresponding issue thanks to synchronization rules. Only stories that have been imported from a bug tracker can trigger updates of remote issues through the synchronization process.
First, choose the state that triggers the update. Then, choose the remote field to update and its new value. Some field values are retrieved from you bug tracker. You can refresh them from the “Configuration” tab.
For textual fields, you can enter a string with optional variables which value depends on the context of the story:
- story: id, name, description, notes, origin, effort, rank, affectVersion, suggestedDate, acceptedDate, plannedDate, estimatedDate, inProgressDate, doneDate
- user: lastName, firstName, username, email
- project: id, name, pkey, description, startDate, endDate
- release (for stories associated to a sprint): orderNumber, name, startDate, endDate
- sprint (for stories associated to a sprint): index, goal, velocity, plannedVelocity, deliveredVersion, startDate, endDate
To use these dynamic values, wrap them into ${…}, e.g. ${story.name} … ${user.username}.
Update or delete synchronization rules
Synchronization rules can be updated or deleted.
Synchronize on import
You can combine import and synchronization rules in order to create feedback loops. To do so, define synchronization rules that are triggered by the state set on imported stories.
For instance, define an import rule that imports issues as accepted stories. Then define a synchronization rule that updates the status of an issue to “confirmed” when the story is “accepted”. The combination of these rules will update the status of every issue to “confirmed” when it is imported in iceScrum.
Such synchronization might exclude issues from the filter just used to import them.