Obsolete iceScrum documention (R6#14+) This documentation applies only to old iceScrum R6. For new iceScrum v7, click here.
This document presents a great feature of iceScrum Pro: Administration. It brings you new iceScrum views and features that help you to administrate your iceScrum server and to manage your projects.
With iceScrum Pro, the administrator can access the following menus:
![]()
iceScrum settings
In the community version, it is possible to configure iceScrum behaviour by editing a file named “config.groovy”. These updates take effect after restarting the server. iceScrum Pro allows you to define your settings in the tool itself, with a nice user interface.
Most of the changes take effect immediately. If not, you will be notified that you need to restart (you can choose to restart immediately).
Please note that iceScrum Pro features come with their own settings when needed. Please refer to the features documentation for more information about specific settings.
Settings are saved in a config.groovy file stored in your home/.icescrum directory. You can set the file location manually by adding this to your JVM parameters:
-Dicescrum_config_location=/path/to/dir/where/i/can/write/config.groovy
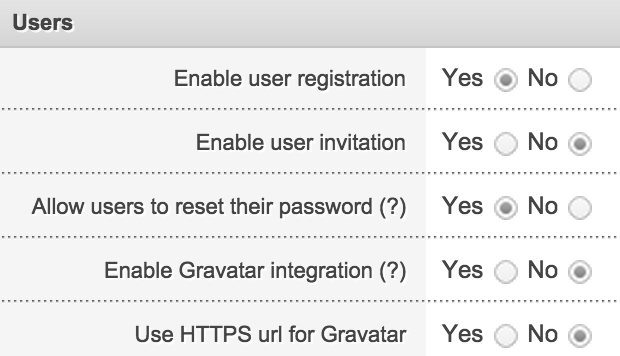
Users
This panel allows you to configure user permissions: you can enable/disable user registration, user invitation (by email) and user password reinitialization (by email). As explained below, in iceScrum Pro, the admin user can set any user’s password manually as an alternative to email reinitialization. You can also enable/disable Gravatar integration (Gravatar is an online service which associates an avatar with an email address).
Projects
This panel allows you to configure permissions for projects. These permissions don’t affect the admin user who is always able to manage projects.
![]()
Several important iceScrum features rely on the ability to send email. Such features are invitations, notifications when stories are updated and password retrieval. For that, iceScrum requires an external SMTP server.
You will need to enter the email server host, port and your username/password if your server requires authentication.
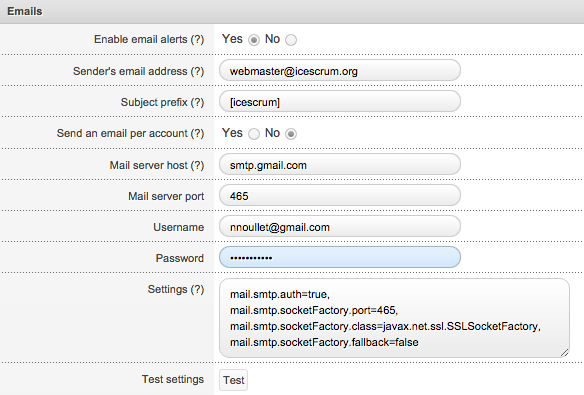
Then, you may have to add a technical setting in the “Setting” field:
- If you use anyonymous authentication (no username/password) then enter this
mail.smtp.auth=false
- If your email server is accessible through SSL then enter this (this example works for smtp.gmail.com)
mail.smtp.socketFactory.class=javax.net.ssl.SSLSocketFactory
- If your email server is accessible through TLS then enter this (this example works for smtp.live.com, i.e. Hotmail/Live/Outlook webmail):
mail.smtp.starttls.enable=true
Database
This panel allows you to configure your database. iceScrum supports the main DBMS. You will need to restart iceScrum for these changes to take effect.
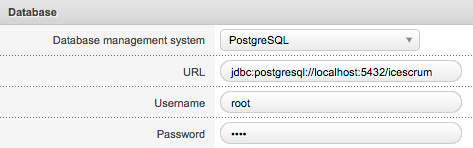
The URL is pre-filled according to the DBMS you chose. Here are some sample URLs:
– MySQL: jdbc:mysql://localhost:3306/icescrum?useUnicode=true&characterEncoding=utf8
– Oracle (10g XE): jdbc:oracle:thin:@localhost:1521:XE
– PostgreSQL: jdbc:postgresql://localhost:5432/icescrum
– SQL Server: jdbc:sqlserver://localhost:1433;databaseName=icescrum
Advanced settings
This panel allows you to configure advanced settings. You will need to restart iceScrum for these changes to take effect.
![]()
– Server URL: the external iceScrum URL. Any port change requires an update of Tomcat settings (server.xml). The Server URL cannot be changed in the administration if you use icescrum.jar, refer to the install guide in order to change the URL in the startup command.
– Base directory: the directory (relative or absolute) used for attachments/avatars. Write rights are required.
– Resources directory: the directory (relative or absolute path) used to store resources (css/js/png). Write rights are required.
– Enable checking for new version: will display a warning if you don’t have the latest available version.
– Enable verbose logging: this is recommended in order to investigate when you come across an issue.
– Enable verbose logging for security: this is recommended in order to investigate when you come across an issue related to authentication (e.g. LDAP).
– Log directory: the directory (relative or absolute) used for log storage. Write rights are required.
– Download log files: get your server logs directly in the web interface without having to looking for it in the server filesystem.
– Test push connection: should display two dialogs (request = ping and response = pong) if the push system works properly.
– Enable CORS on REST API: Enable CORS support (Cross-Origin Resource Sharing). This mechanism allows AJAX request from a domain that is different from the one of your iceScrum server.
– Allowed domains for CORS requests: Limit CORS requests to domains that match the regular expression, for instance (http://|.+.)example.com (use simple backslash for escaping). If empty, all domains are allowed.
Project administration
In iceScrum, the administrator can only administrate projects one at a time. In iceScrum pro, a dedicated view provides an overview of the all projects hosted on your server. This feature makes project administration easier.
List all projects
It may be useful to have an overview of your iceScrum projects. In iceScrum pro, the main view of the project administration provides a list with useful information (members, configuration):
![]()
For each project, you can browse a menu that provides useful features (these features are described below):
![]()
Create projects
In the Project administration view, you can create a project by clicking on the New button in the toolbar. This will display the wizard that allows regular users to create projects.
View projects
The View menu allows you to enter the project as if you were one of its members, with Product Owner and Scrum Master rights combined. This can be useful in some circumstances but we think this should be used carefully since the administrator is not really part of the Scrum team.
When viewing a project, you can switch back to admin view at any time:
![]()
Edit teams
By clicking on the Team menu, you can edit the project team in the same way that the project’s owner and the Scrum Master can do it:
![]()
Edit projects
By clicking on the Edit menu, you can edit the project preferences in the same way that the project’s owner and the Scrum Master can do it:
![]()
Delete projects
By clicking on the Delete menu, you can delete any project. A popup will be displayed for confirmation. Be careful, project deletion cannot be reversed.
User administration
The iceScrum community version doesn’t provide any way to administrate users. iceScrum Pro brings you the ability to create several users at once and to update/enable/disable users.
List all users
The main view of the user administration displays all the users registered on your server (by default they are sorted by first name). You can see information such as email, creation/last update dates and the number of teams of which the user is a member.
![]()
You can filter enabled/disabled users (how to disable a user is explained below).
Create users
When starting one or more projects, it may be useful for the administrator to create all the involved users at the same time. When you click on the New button in the toolbar, a form appears with the same fields users can fill in when registering. Thus, you can set the user’s email, password, language etc..
![]()
To create several users in a row, click Add and continue or hit shift + return: The fields are cleared and you can enter a new user. When you have filled in the last one, click Add or hit return so you will be redirected to the user list where you should see the new users.
Edit users
At any time, you can edit a user by clicking on the Edit menu:
![]()
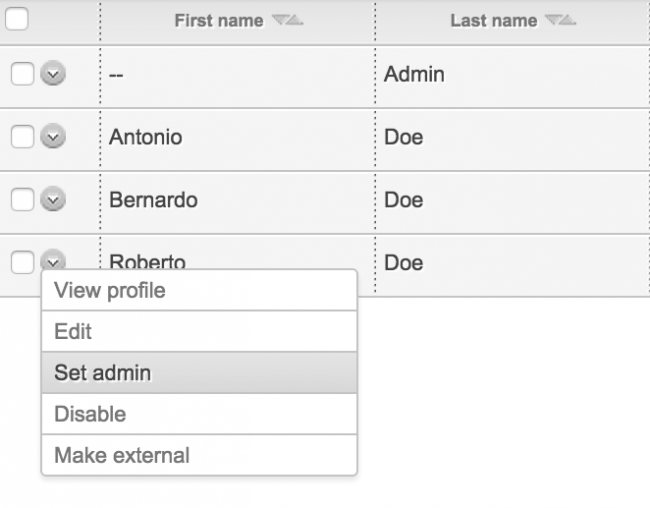
Disable/Enable users
When a user leaves a project managed with iceScrum, you may want to prevent her from being able to log in. With iceScrum pro, you can disable users in the user administration. Click on Disable in the user menu and the Enabled value for the current user row should be switched to “No”.
![]()
Disabling a user prevents her from logging in, unsubscribes her for notifications and hides her from the users you can add into teams. However, this user will still appear in her teams and mentioned as the author/owner of her tasks/stories, but with “(disabled)” appended to the full name.
There is no delete feature because “disable” provides the same benefits without losing data. Thus, you can enable a disabled user so she will be able to log in, receive notifications and be added into teams again.
Change authentication type
iceScrum Pro allows authentication through a LDAP directory. Please read the dedicated documentation for more information. There are two types of users, depending on their authentication mode:
– Internal: usual iceScrum users. They are authenticated according to their user / password registered in iceScrum. There is no attempt to authenticate them through LDAP. Users created through the register form or from the user administration panel are internal by default.
– External: users that can authenticate only through LDAP. If the LDAP authentication fails, they can’t log in. When a new user successfully logs in into iceScrum for the first time through LDAP, the corresponding iceScrum external user is created from her LDAP attributes: username, first name, last name and email address. Consequently, there is no need for the administrator to create them manually. Their email address cannot be updated in iceScrum since it is intended to be defined in the directory.
![]()
The user administration menu allows you to change the user type at any time. For instance, this allows you to migrate an existing user base to LDAP. Such changes will have the following consequences:
– Internal -> External: The user won’t be able to log in if she can’t be found in the LDAP directory. Only enabled users can be made external. You may have to change the username so it matches the LDAP one.
– External -> Internal: The user won’t be able to log in anymore with their LDAP credentials. Don’t forget to define their password in iceScrum so they can log in.
Define administrators
By default, there is only one Administrator account: admin/adminadmin!. You can define other administrators but be very careful, they will be able to do everything that can be done on iceScrum. You can remove administrator permissions from any user except yourself.
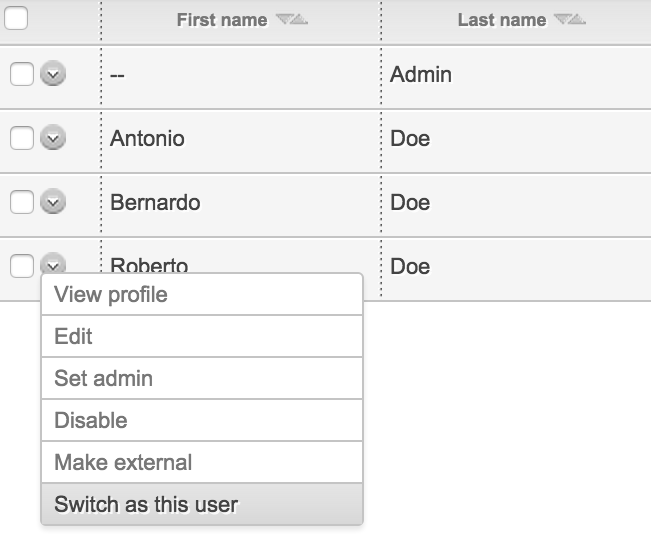
Switch to a user account
You can switch as a user temporarily in order to see what they see in iceScrum. This may come in handy for support purposes. To switch back as admin, browse the main menu and click on the corresponding button.
Batch actions
You can batch enable/disable and make internal/external by checking the checkbox corresponding to the user you want to change and then click on a button in the toolbar.
![]()
You can also check / uncheck all the user rows.