Obsolete iceScrum documention (R6#14+) This documentation applies only to old iceScrum R6. For new iceScrum v7, click here.
-
1 - Install & Upgrade guide (R6)
2 - Getting started (R6)
-
3 - Features (R6)
-
4 - Integrations (R6)
-
5 - REST API (R6)
-


Register / login
You can register and log into iceScrum just as you would do on any website. If you want to administrate, batch create users or have them authenticate through LDAP, have a look at iceScrum Pro Standalone.
iceScrum Community / Pro Standalone
If you use iceScrum Pro Cloud then please refer to the next section: the register & login process is a little different for you.
First, click on the “connect” button on the top right of your iceScrum to navigate to the login page. If you don’t have an account, click on the “registration” button.
![]()
Enter your information in the registration form. All fields are mandatory except the activity, which is just informative. Except the username (choose it wisely), you will be able to change this information later.
![]()
If the registration information is valid, you should be redirected to the login page. Just type your password and valid. Congrats, you joined iceScrum!
Once your are connected, you can update your account information by clicking on “Your account”.
![]()
iceScrum Pro Cloud
If you use iceScrum Community / Pro Standalone then please refer to the above section.
When using iceScrum Pro Cloud, your account authenticates you on:
- the iceScrum.com website https://www.icescrum.com where you manage your subscriptions and licenses,
- our forums https://www.icescrum.com/forums/,
- the hosted iceScrum Pro Cloud application https://www.icescrum.com/a.
To register, follow this link: https://www.icescrum.com/my-account/?signup=yes.
If you want to update your account information or purchase subscriptions / licenses, click on “My Account” in the main menu. When you are done, click on “Go to iceScrum” in order to open iceScrum Pro Cloud and start managing your projects.
Create and setup your project
The creation wizard eases to start with iceScrum by quickly creating what is essential.
![]()
Video tutorial
Define your project
First of all, you define the project name and project key (a human-friendly identifier that will uniquely identify your project).

Choose your team
When you create a project, you get all the permissions on it, which is equivalent to being Project Owner and ScrumMaster.
If you have already created a team you can choose it. Otherwise, you can create a new one by typing a new name. If you create a new team, you will be automatically included as ScrumMaster and you can add new members. Otherwise, the members are already defined and they cannot be changed here so you can skip to the next section.
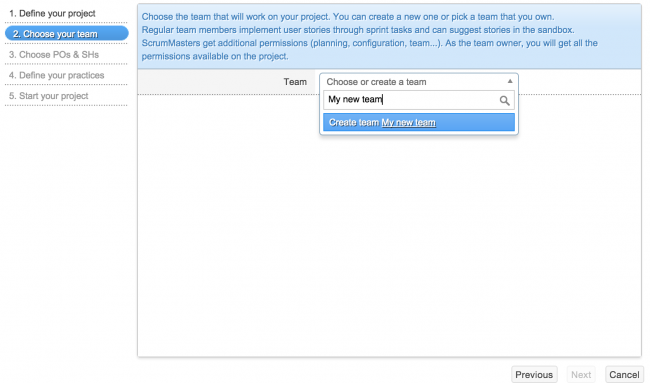
In a new team, you can look for new member in the search bar and choose the role:
- Team Members, which is the default role, who implement user stories through sprint tasks and can suggest stories in the sandbox,
- ScrumMasters who have Team Member permissions and get additional permissions: planning, configuration, team…
Once you have defined your team, you can go to the next step. For more information regarding the roles, you can refer to the documentation: Roles, teams & projects.
Choose POs & SHs
Here you will define the Product Owners and Stakeholders of your project:
- Product Owners are responsible for your product vision: they refine user stories, accept them into the product Backlog and prioritize them.
- Stakeholders are people interested in your project but who will not actively work on it. Stakeholders can be defined only on private projects because every registered user has Stakeholder permissions on public project.
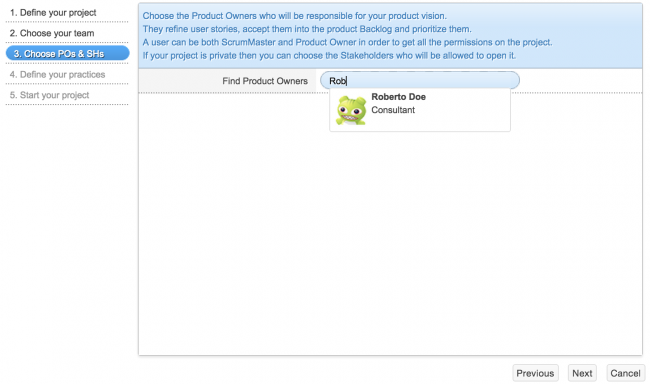
A user can be both ScrumMaster and Product Owner in order to get all the permissions on the project. This is the only team role / product role that is allowed so don’t be surprise iceScrum prevents other combinations (e.g. you try to add someone that is already Team Member as a Product Owner). For more information regarding the roles, you can refer to the documentation: Roles, teams & projects.
Define your practices
Default practices are well suited for getting started, let’s keep them for the moment.
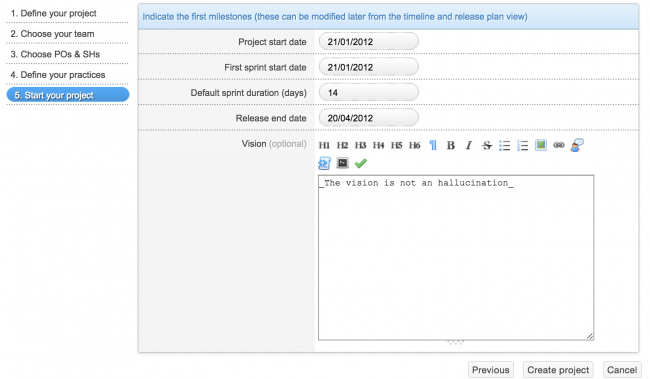
Start your project
Finally, you can define the lifecycle and to start the first release. By default, sprints last 2 weeks (14 days) and releases last 3 months. The wizard suggests that the first sprint start the day of the project creation; by changing this date, you can define a period before the sprints start, frequently called sprint zero.
After this last step, the project creation is done. Let’s give a look at the result!
Look at the results
You can now have a look at the result in the timeline view that has been initialized with the creation of the first release and its sprints, according to the default durations, in the step 4 of the wizard. Of course, release dates can be modified later and other released can be created.
The timeline view shows the life of a product in the long-term, presented along the timeline, with the successive releases and the sprints contained in these releases.
![]()
Create features (optional)
Video tutorial
Create Features
In iceScrum, features are managed in an independent list: the features list or features backlog. For a new product, a top-down approach is often used, by starting with the definition of features.
![]()
A different color can be used for each feature in order to ease the identification of stories associated with this feature. It is possible to use the value attribute to describe the added value of the feature.
![]()
Create your first story
The place where all team members can suggest stories is the sandbox, which is the waiting room for your product. Stories can optionally be associated with features.
Video tutorial
Suggest your first stories
When you add a new story, you can define its type (user story, technical, default), describe it and optionally choose to associate it with a feature.
![]()
At startup, the initial sandbox can contain dozens of elements. It is the right place to complete the knowledge about a story. All the participants can contribute their comments in the detailed view of the story.
![]()
Accept valuable stories
As soon as he thinks that a story is sufficiently detailed, the Product Owner evaluates it. If he thinks it brings value, it accepts it as a story, which moves it in the backlog.
![]()
Manage your product backlog
Thus, the backlog is the set of stories accepted by the Product Owner. In the backlog, the Product Owner can prioritize stories by ordering them and the team can estimate them.
Video tutorial
Prioritize your backlog
The Product Owner defines priorities by moving the Post-its. The highest priority is at the top left of the view.
![]()
Estimate your stories
The team estimates the stories, generally through a planning poker. The estimations are entered by a team member or by the ScrumMaster, by clicking on the ‘?’ on the Post-its.
![]()
By default, the evaluation can be done according to the Fibonacci suite. This can be changed by modifying the practices (Menu Project).
![]()
Plan your release
Video tutorial
Plan your release
Release planning consists in the association of stories from the backlog to sprints of the release. Only estimated stories are candidate for planning and the sprints must also be created. It will be possible later to changes the association, e.g. by moving a story from one sprint to another one.
Once sprints of the release are created and the backlog is estimated and prioritized, the planning can be done. With iceScrum, the release planning can be done manually or automatically (iceScrum takes velocity and priority into account for automatic planning). Since velocity is not measured at the beginning, it is better to do a manual planning.
![]()
An easy way to plan story is to open the release plan view while having the backlog in reduced view (widget). You can then drag & drop stories from the backlog widget to the desired sprints.
To help getting started, the first release is automatically started.
Plan your sprint
Video tutorial
Plan your sprint
The sprint view displays a board with Post-its and can be reached from the timeline view, from the release plan, or directly from the menu bar. The planned stories appear in the left column.
![]()
During sprint planning meetings, during which the team members identify the tasks. It is possible to create recurrent tasks which can be copied over the sprints and urgent tasks that doesn’t belong to a story.
![]()
When all the tasks are created, with their eventual “remaining work” and a person designated as responsible for it, the sprint can be activated to materialize the commitment agreed in the meeting.
Start your sprint
Congratulations, you are now ready to activate your sprint!
![]()
Your team members will then be able to update the status of their tasks by dragging them to the column ‘In Progress” and “Done” and update their “remaining work”. Of course, other tasks can be created if necessary.