Documentation This documentation applies only to iceScrum v7.
For old iceScrum R6, read the documentation or migrate.
Install iceScrum v7 on a new server and export your projects from the R6 to v7.
Principles
Procedure
The most important thing you need to know about migrating from iceScrum R6 to v7 is that you need to install iceScrum v7 on a different server.
Here are the main steps to migrate:
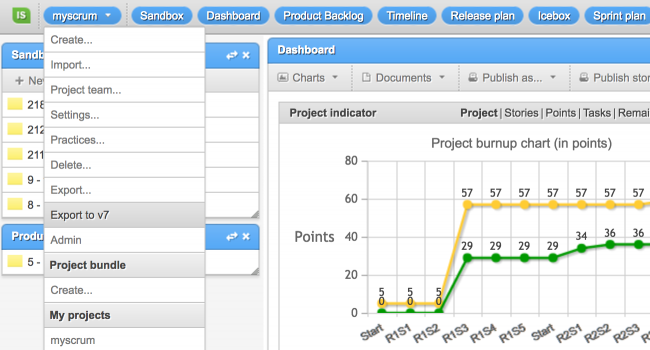
- Upgrade your old server to R6#14.15 that provides a new project menu: “Export to v7”
- Install iceScrum v7 on your new server
- Export a project from the R6 “Export to v7”
- Import the project into iceScrum v7
- Go back to step 3 for another project until you have migrated every project
This means that for the moment, you will need to export projects one at a time. It may take some time but it’s better to ensure that everything goes well.
User migration and conflicts
Users are migrated automatically with the projects / teams they belong to. This means you do not have to create the users manually on the v7 server.
The only user you will create manually on the v7 server before the migration is the administrator account created from the setup wizard. To avoid conflicts, if you have a administrator account with similar username / password in one of your team / project, you should remove them before the migration so they are not exported, thus avoiding the conflict when importing it on v7.
To improve the user experience, the email address must now be unique on the server, that means that you may come across conflicts if two migrated users have the same email address.
When a conflict occurs, you will be asked to resolve it manually.
Differences
There are so many differences between R6 and v7 that we cannot go through all of them. The best way for you to learn about them is actually trying this new version and see it by yourself.
You can also get a sneak peak of the iceScrum v7 UI and features on this page: https://www.icescrum.com/your-new-icescrum/.
Migration
1 - Upgrade old server to R6#14.15
This version brings very few differences appart from a new button named “Export to v7” that will be shown next to the regular “Export” button in your project menu.
In order to upgrade your server there is nothing special, download the .jar or .war depending on your installation and follow the regular procedure: https://www.icescrum.com/documentation/upgrade-guide/
Download icescrum.jar R6#14.15
Download icescrum.war R6#14.15
2 - Install iceScrum v7 on new server
Installing iceScrum v7 is quite similar to the R6 version. However, there are two noticeable differences:
- you can now use Java 8
- you can now use the .jar version for production, even behind a proxy
Read the v7 install guide for the full procedure and the v7 download link:
https://www.icescrum.com/documentation/how-to-install-icescrum/
Current valid iceScrum Pro licenses can be migrated to iceScrum v7. Please contact us once your iceScrum v7 server is working in production, we will generate a new key for you from the new Server ID.
Most iceScrum Pro features are available on iceScrum v7. If you have any doubt about a feature you use, please contact us.
3 - Export a project from R6
To export a project, open it as a ScrumMaster, Product Owner or Administrator and click on “Export to v7” in the main menu.
If you want to automate exports, you can use the API. Unlike other API calls, this one doesn’t require that you enable webservices support on your project. You need to provide the credentials of a user who is ScrumMaster, Product Owner or Administrator.
Here is a cURL command demonstrating the V7 export from the API:
curl -H "Accept: application/xml"                       \
     -o myProj.zip                                      \
     -u myUsername:myPassword                           \
     http://mycompany.com/icescrum/ws/p/MYPROJ/exportV7
4 - Import the project into v7
First, ensure that the new server is fully configured and that a license is applied if you have one before importing your projects.
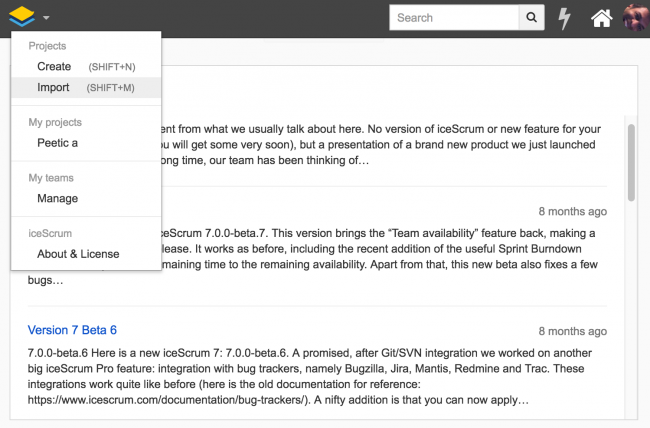
From the main menu of your new server, click on “Import” and import the file. There is no specific action required. If a user is not found on the new server, it will be imported alongside with the project.
We have tested the procedure on lots of projects before making it public but better be safe than sorry, check that your project data has been imported properly before starting actual work on it. Once new data will be created on the new project there will be no way to migrate again without losing your new data.
Bugs & help
If the migration goes wrong, please check that you use the latest versions of iceScrum R6 and v7. Big projects may take a long time to export so if you use a reverse proxy in front of your R6 server (Apache, HAProxy, nginx), ensure that the timeout allows long requests (e.g. 30 minutes).
When being imported, the project must fit in the v7 memory. You may want to temporarily configure a bigger Java Heap (-Xmx), e.g. to 2GB or 4GB until the migration is done.
If the migration still fails, please contact us and provide as much information as possible: project export files, logs…
Automatic migration
Prerequisite
Be sure to follow steps 1 and 2 as described above since the automation replaces only steps 3 and 4. The R6 server must be at least R6#14.15 and its URL must be reachable from the v7 server.
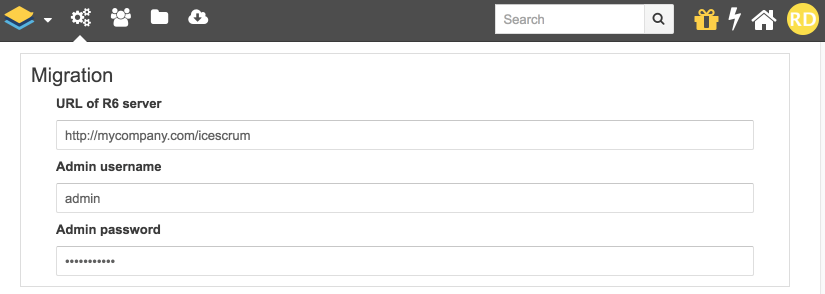
Log in as an administrator on you v7 server and open the Settings window. Enable verbose logging in the Advanced Settings panel and then provide the URL and administrator credentials for your R6 server in the Migration panel and update.
Get the list of the project keys (upper-case) separated by a comma. Here is how to get all the project keys in the proper format from a R6 MySQL database:
SET SESSION group_concat_max_len = 10000;
SELECT GROUP_CONCAT(pkey SEPARATOR ',') FROM icescrum2_product;
Migrate
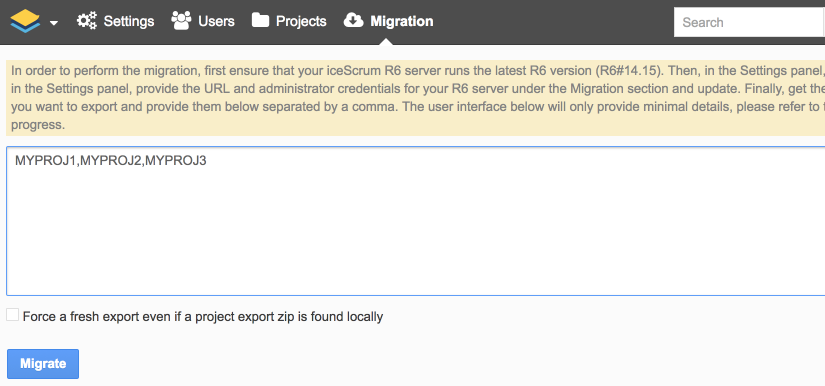
Migrating big projects can take a long time and consume significant resources, please take that into account before starting the migration. When you are ready, enter the comma-separated project key list in the text area and start the migration.
For every project in the list, iceScrum first checks if the project key is found in the v7 database. If it is found then the project is skipped. If you want to import it again, delete it first from the v7 server (or change its key and name).
Then the project is exported. Exports are stored as zip files on the v7 server in the iceScrum base directory under a directory named “exports”. They will be reused if you try to import them again. If you want to start again with freshly exported data, check the “Force a fresh export” checkbox before starting the migration. If needed, you can manually put a R6 export zip in this directory and name it with the pattern PKEY.zip so it will be used instead of exporting the project.
The user interface only provides minimal details. Refer to the logs in order to track the progress.
Only configuration errors will interrupt the migration process. If a project migration fails for other reasons, then iceScrum logs the error and skips to the next project. That is why verbose logging must be activated and you have to check the logs to know how the migration went. As opposed to manual import, the automatic migration does not display a pop-up to resolve data conflicts so you will need to handle them through manual export/import.
Once the migration is done, you may want to delete all the export zips to free disk space. They are located in your iceScrum base directory under a directory named “exports”.